

Prints (0)
-
No Prints Yet
Be the first to upload a Print for this Design!
Description
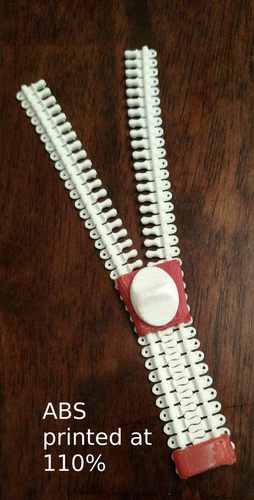
Summary Work in Progress. Your ideas and comments are welcomed! June 2017: I Made it easier to print and added an end stop. No need for support. If you use the new model and you print in ABS, increase the size by 10% to make it less likely to break. The size, as is, is fine for nylon. My goal is an actual zipper, that you could iron onto cotton tape and actually sew into something. May 2017: I too felt the urge to see how close I could get to a real zipper. Why? Because it seemed like it would be hard to do. It works pretty well, but I had to go through about a dozen iterations. I am quickly learning the limits of tiny FDM printed parts. Make something too thin, it breaks too easily, make it too thick and the zipper is not flexible enough. I have made it possible to sew it onto cloth. Or maybe even ironing it onto cloth. I am not at the point of trying that yet. There are many caveats about this model. Mostly, the dimensions are too thin in places. You can break things just removing the supports. I will likely make it slightly bigger. I will make a few modifications, so stay tuned. I may add end stops, etc. If I can get it a little more easy to build, I will parameterize it in SCAD. Print Settings Printer Brand: FlashForge Printer: Creator Pro Rafts: Yes Supports: Yes Infill: 100% Notes: The model is sized for nylon. If you print in ABS, increase the size by 10% I used a raft because the teeth are really small, and there are many of them. The first layer has almost no footprint for the teeth, and I tried several times to get this started with no success. As far as I know, a raft is required. I used the base layers and 2 top layers. There are thin walls and rails that need to be filled in. Check the slicer to make sure that the thin parts do not have a hollow interior. Post-Printing Removing supports. Gluing the thumb thing to the slide. Tricky. Tricky! The supports are holding up thin walls that are easily broken. Remove them slowly, carefully. I have no idea why I arranged the two sides of the zipper to be interlocked when printed. When you pull them apart, you can begin by gently rolling them between your thumb and finger to break them apart a bit. If you separate the top two teeth by that magic angle, they begin to unzip. I super glued the thumb thing to the top of the slider. How I Designed This Drawn from scratch in Blender.
Comments