Whether you’re looking to prototype a product or design something creative, 3D printing can help bring your idea to life. To take full advantage of the creative potential of rapid prototyping, you’ll need to know how to design 3D files (also known as STL Files). If you want to
learn more about 3D printing in general, check out our blog on
What is 3D Printing?
We’ve learned a lot while running our 3D printing marketplace, and with the help of our talented community, we’ve worked hard to compile all that knowledge and experience into one place. So, if you’re new to the additive manufacturing world or want to become a 3D designer on Pinshape, here’s your step-by-step guide from ideation to creating your design and selling it, so you can get some money in your pocket
and grow your reputation!
If you know someone else who could benefit from this 3D Printing Design
Guide, please share. Because friendship! And sharing is caring.
Design all starts with a vision of what you want to create. Once you have that idea, you can begin turning that into a high quality model
for people to download.
If you’re looking to contribute your design to the community for free, great! Many online designs are free, but if you’re looking to sell yours - it has to be something people are willing to pay for. Here
are the designs with the most downloads on Pinshape:
Top 5 Free Designs on Pinshape in 2015
Top 5 Paid Designs on Pinshape in 2015
You’ll notice that many of the top 10 most downloaded files have a few things in common. Here are some tips before you start thinking about
what you want to design:
4 Key Ingredients to Creating a Hot Design
1) Create something fun or useful!
The most popular designs on Pinshape are from 2 categories:
Toys + Games
and
Home Living.
Why? Toys and games are fun, and items like vases and pen holders are practical. Your design should be one or the other if you want it to be a hot seller. Additionally, look for well known products you might be able to piggy-back off of to connect with passionate owners. Products like cell phones, camera and quadcopters all have dedicated followings and owners looking for cool accessories for their new favorites gadgets.
If you can create something unique and useful, you’ll be in great shape!
2) Know Your Audience
Just as with any product or service, you need to make sure your offering matches the demographics you are most likely to reach. The products that tend to currently be most successful on digital 3D printing marketplaces are catered toward young (20-35), tech-savvy males, with a healthy dose of pop culture references. Additionally, the market for educational prints that can be used by students and teachers alike is growing rapidly. While there are certainly exceptions to this, these target demographics are the most prevalent at this point
in the hobbyist 3D printing world.
3) Easy to print
Makers are more likely to download your print if they already know the settings for an optimal print. That means you’re more likely to sell the design if you’ve actually printed it yourself and publish the settings you use. You should also create your design with optimal
printing ease in mind. See our chapter on
design principles for 3D printing
for more detail on this point. Everyone wants to have successful prints with minimal failures, so be sure to pay attention to this and your
followers will grow quickly!
Pro Tip:
“Some details in the design are lost during the 3D printing process, or some elements could be too thin to print. If you want to make your
design easy to print, keep it simple.”
— Clair from Sculpteo
4) Make it Unique
Once you start designing, you’ll want to come up with your own unique style that will set you apart from everyone else. Keep in mind, just
because something is unique doesn’t mean it needs to be complicated.
3DKitbash
does a great job of creating simple yet eye catching and unique designs.
Pro Tip:
“The best tip I can give to a beginner learning 3D is to find someone who already works in the field to help define a manageable project and
goals for the beginner.”
—
Thomas Davis
Once you have a good idea of what you want to create, read Chapter 2
and decide which 3D modeling software is right for you.
Chapter 2:
Choose the Best 3D Modeling Software
Once you’ve figured out what you want to design, you’ll need to decide which CAD (Computer Aided Design) modeling software you will use. Instead of asking “what is the best 3d modeling software”, a better question is “what specifically do I want to make and what is the best modeling software for that?” When you understand that, you’ll be able to choose a program that enables you to design with the best efficiency. Many designers end up using a workflow that involves multiple programs because each software package excels at certain
areas of design and print prep, so we’ll cover a number of options.
Solid vs. Mesh Models
Even before deciding on which specific program you’ll use, it’s good
to have an understanding of different types of models; solid and mesh.
A solid model’s volume defines its form.Think of creating an object by adding and subtracting chunks of clay to create a volume. When working with solid models, you’ll generally be merging together individual solid
forms to create your final design.
A mesh model, however, is hollow with a skin of polygons, or flat surfaces. It contains data about the structure of the model and the vertices of the object. You can use both solid and mesh modeling to build your design, but each one is more appropriate for different kinds
of modeling.
When to use Mesh vs Solid Modeling?
It’s best to use mesh modeling software when creating organic, free-form designs, like a character. This is because mesh modeling allows for easy molding of the object and modification of smoothness which solid modeling software does not. Think of the mesh as the
wireframe of your design.
Solid modeling is the foundation of your design and contains the details of its physical properties and its mass. Solid modeling is best for designs where mechanical precision is important, rather than surface details. For example, designing a phone case would be better
done with solid modeling.
If required, you can convert your model from mesh and solid and vice
versa depending on what features you want to edit.
Solid Modeling Software vs. Mesh Modeling Software
The picture below shows a mesh model on the left and a solid model on
the right. The mesh was made with
SketchUp Make
and the solid was made with
123D Design,
part of the
Autodesk 123D suite
of modelling apps. SketchUp makes mesh models like
this
and Design makes solid models like
this.
Both programs are free and great for beginners.
Proficiency with mesh and solid modeling is desirable to get the best of both worlds. For example, you could model Bulbasaur in SketchUp, an impossible task in Design. You could model a torus, which is a snap
in Design but laborious in SketchUp.
Put them together and voila, a one-of-a-kind ring! Design can also
be work-flowed with
123D Tinkercad,
another solid modeling program. It has features that Design doesn’t. One being the ability to resize an item after you’ve made it (although
the Design team has promised this feature in a future version).
Pro Tip:
“Mastering CAD software is a long that requires patience and lots of time in front of the screen. The good news is that the software is now extremely accessible, and developers like Autodesk are investing a lot of resources into targeting entry-level users”
—
James Novak, a.k.a.edditive
Free CAD Software
To get you started in 3D design, there is a lot of incredible free design software that you can start using today. Here are a few of
our favorites:
Rendering:
This software doesn’t give a realistic image render. You can not apply colours or textures.
Great For:
This CAD software is great for industrial designers because it creates parts that are dimensionally correct. It’s also great for prototype modeling or creating an accurate representation of a manufactured object. The user interface is simple and user friendly. Designs start off as basic shapes and get more complex as the designer adds more shapes or cuts away parts of the model. There is also a collection of free objects to use to get started. 123D Design’s tools and process are similar to more advanced programs like Solidworks so it makes transitioning easier.
Rendering:
This program creates realistic looking renders that include texture and colour. If you’re creating an owl with ruffled feathers, you can add those features here. 123D Sculpt+ also allows you to add images to your object, like a logo, for example.
Great For:
Creating character animations or creatures. The user experience is very intuitive which makes it great for beginners or children learning design. This is the software to use if you want to recreate characters from your favourite movie. One drawback for 3D design is that the file format is .obj files so file conversion to .stl is necessary and needs to be done with another program. Check out our
chapter on file conversion
for more details.
Rendering:
Blender let’s you recreate picture quality images and is the best free rendering software. While Blender has the tools to create a realistic model, it takes a lot of time and effort on the designers end to create the renders.
Great For:
Design work that is complex and detailed. This could be anything from animation of characters to intricate scenes. It is not as intuitive as the other programs mentioned so far and will require some time to explore. There are many tutorials that are available online which will speed up this process. It is also a good introduction to software like Maya or 3DS Max which are great for top end renders.
Great For:
This software explores the evolution of a design. Instead of creating an exact model, it allows you to build abstract shapes or images and creates incremental changes in your design, like evolution. You can then choose from a variety of different models created and 3D print the one you like the best!
Type of Model:
Solid modelling, parametric — aka. it also allows you to record all the changes and actions you make and updates the whole model as you edit.
Rendering:
You can add on outside rendering applications which give the program elementary rendering capabilities.
Great For:
This software works well for engineers. It’s ability to keep track of changes and apply updates makes it a great for modeling parts and products. The parametric characteristics allow designers to change details from the very start of the design process. This program may also take time to familiarize yourself with but offers a diverse toolset. This is comparable to programs like Solidworks which would be the next level up if you are getting into industrial design.
Rendering:
You can add outside rendering applications
Great For:
Engineering designs or any projects that require collaboration from more than one person. Onshape is the first fully cloud 3D CAD software that allows teams to simultaneously collaborate on a file through their internet browser.
Great For:
This software creates models from source code, much like code that websites are built from. Instead of building an object from shapes, you create it through typed commands. This is a great tool for those who do not have a traditional design background and think like a programmer. One disadvantage of this method is that it is more challenging to create complicated models and is not the ideal modeling software for those without any previous coding knowledge.
Type of Model:
Mesh with colours and texture capabilities
Rendering:
Although you can use this software to create models with colour and different surface texture, you can’t export the model as a high-res image. You can, however, download additional software that will let you do this.
Great For:
Similar to 123D Sculpt, this is a great program for creating animations and imaginative characters. Instead of being limited to using the software on a tablet, this is computer friendly! This is an introductory software that’s great for beginners because it’s intuitive without investing a ton of time into learning. The next level up from this software is ZBrush which gives you more advanced tools to play around with. This software also creates .obj files so you will need to convert them to .stl to 3D print them.
Type of Model:
Mesh, and some basic solid capabilities
Rendering:
This software has a number of plugin options and utensils that create both life-like images and graphically stylized images.
Great For:
Formerly Google Sketchup, this is a well rounded software that includes instructionals to help you get the hang of it! There is a premium version that many engineers use to create illustrations to show their clients. The first version was released over 10 years ago and is often used by 3D design instructors for teaching. One of the greatest advantages of this software is the number of plug-in options. The plug-ins for stl file repair are especially important since Sketchup is a mesh modeler.
Rendering:
Although it does let you give colour to different parts, it doesn’t create life-like images. The main purpose of this software is to create 3D designs.
Great For:
This program creates 3D printing models in your browser without downloading any software on your computer. The user experience and tools are akin to to 123D Design which makes it a great program for beginners. You can also transfer existing 2D and 3D files that you created from other programs into TinkerCAD to get you started. The online community says TinkerCAD is faster to learn than comparable software but doesn’t have all the tools that 123D Design does.
Things to Consider
Before you choose which software you would like to use, think about what you’d like to print and use the software that has the features
you will need for your design.
We’ve gone through a lot of free 3D software options and the following
chart serves as a quick reference guide to the different software we explore:
If you’re already comfortable with the free tools and you’re looking for some advanced, pro-level functionality, then you may want to move onto the highly polished paid tools. Here are some of paid programs
most commonly used in 3D design:
Great For:
Creating prototypes for personal or business use. They have a built in CAM (computer aided manufacturing) applications that let you create toolpaths.
Best part - the full version is available free
for hobbyists, makers, and startups that make less that US $100,000 in revenue on their models per year.
Great For:
Professional 3D animations and rendering large scale projects. The newest version has a “max creation graph” that allows you to create
custom scripted tools without learning code.
Price:
$195 USD for Windows, $95 USD for Mac OSX
*student/faculty prices, commercial prices are higher
Works with:
Windows and Mac OS X
Great For:
General CAD design & surface modeling. Used for things like 3D product
and machine design.
Pro Tip:
“My advice is that you should pick the 3D software that you feel most comfortable working with, because achieving your final product is the target—not mastering tools. So it’s better to spend more time using whichever one you feel is best for you.”
—
FORMBYTE
Now that you’ve decided on a right 3D modeling software for you, read Chapter 3 before you begin the concept work for tips on best
practices on design principles for 3D printing.
Chapter 3:
Apply Design Principles for 3D Printing
Designing for 3D printing is different than designing purely for digital use. Since you’ll be bringing your product into the physical world, you’ll need to be aware of some key technical guidelines. For this guide, we’re assuming that you’ll be designing for an FDM desktop printer. There are other types of printer technologies which we go over in our blogs on
FDM vs. SLA
and
FDM. vs. SLS.
Let’s go into a few key principles to keep in mind when you are designing for 3D printing with an FDM printer:
Design to Avoid Supports
What are supports?
Supports are extra material that act as “scaffolding” to hold a design in place if there is nothing beneath it to build on. Depending on your design, supports may needed to prevent filament from drooping when it’s printed, but after the print is complete, the supports can be broken off and cleaned up to leave you with your final design. In most cases, the supports are automatically generated by the slicing software that converts your STL file into a format the 3D printer can read, called G-code. If you’d like to ensure a specific support structure is created, you can design it into your model directly, but in most cases, the
auto-generated support structures do the trick.
Benefits of Reducing Supports
Although supports are sometimes necessary, there are a lot of benefits to designing in a way that avoids them altogether. Here’s a few reasons
why you should care about reducing supports:
Saves time and money:
Designs that require a lot of supports waste material, since they are removed and likely thrown away once the print is complete. Additionally, adding supports means the product will take longer to print (more material = more time), and we’ve seen supports increase print time by up to 100% in extreme cases. When you add in the time required to clean up the supports post-print, the difference in time to completion can be significant.
Lowers probability of printing errors:
Supports add more complexity to the design which raises the probability of errors when printing. For people that regularly use 3D printers, it’s common place for longer, more complex prints to fail much more frequently than short, simple prints. Keep it simple to raise your chances of success!
Creates smoother surface finish:
Using supports typically creates a rougher surface and again, creates more work during post processing to smooth it out. In some cases, the surface may be damaged beyond reasonable repair when using supports.
If you can’t avoid using supports but do have access to a dual extrusion printer, we recommend using a soluble supporting filament like HIPS, which is discussed in more detail in our
filament guide.
How to Reduce Supports
YHT Rule
This is a good way to remember what shapes are safe to design without supports and which to avoid. Thanks to one of our top designers who wrote a more detailed article on
Supports and the YHT Rule.
The basic rule goes as follows:
Anything in a “Y” shape is safe to print without support because it’s a gradual slope which still has enough material beneath it to keep it from drooping. This is another way to think of the 45 Degree Rule, which states that in general, overhangs with a slope greater than 45 degrees will require supports. The more gradual the angle, the better. This is why cone shapes are generally safe.
Designs that take the form of an “H”, where the middle overhang connects to either side is called bridging. Typically, bridges shorter than 36 mm long print with drooping of 0-0.5 mm, bridges 36 to 60 mm long print with drooping of 0.5-2 mm, and bridges longer than 60 mm long print with significant drooping of 2-5 mm. These rules aren’t set in stone, however, since it depends on your material and print settings.
Anything with a “T” shaped overhang will not have any support and will almost certainly create errors in your print. There just plain isn’t enough to hold the material up in this configuration.
Pro Tip:
“Designing [without supports] requires a little extra effort but insures that objects will come off the build platform ready to use without any cleanup. To design for support-less printing requires knowing a few little rules. Those rules be easily remembered with the letters YHT.”
—
Joe Larson
from
Joe’s 3D Workbench
Split the model into multiple parts
Another way to avoid supports is to split up your model into multiple parts so they can print flat. After you print the parts, you can bond them with an adhesive like cyanoacrylate (super glue) or a solvent. This can be especially useful for complex designs and larger prints. Alternatively, you can design connectors and sockets that allow
assembly without adhesive.
Orient your model properly
Sometimes, supports can be reduced simply by rotating your design into the appropriate orientation for printing. For example, in the case of the ‘T’ print above, the need for supports can be completely removed by laying it flat on it’s back. You don’t always need to make
changes to your model to improve results.
Anchor your print
Anchor parts of your design that would go beyond 45 degrees and attach them to a different part of the model to avoid overhang. For example, in the first picture below, the arms are detached from the body with nothing underneath to build on. These models will require supports. In the second picture, the has her arms attached to her body and the baseball bat which is also anchored to other parts of the print. This is a good method to avoid overhang and allows you to print the design as a whole whereas the model on the left has the staff sticking out
which will create some problems.
Design for the Right Level of Detail
There are boundaries on how much detail a 3D printer can successfully reproduce, which means you need to take these physical limits into
account when creating intricate designs.
These are some suggested guidelines on detailing for desktop FDM printer:
Most FDM printers claim to print a minimum layer resolution of about
.05mm but realistically most designs work best with .1mm per layer.
The recommended smallest text size for FDM printers on the top of
your design is 16 bolded and 10 bolded if the text is on a side wall.
A safe starting point for wall thickness is 1mm but it really depends on what the design is used for and on the filament layer thickness. If you are printing something for durability, a thicker wall may
be more appropriate.
The least possible spacing between adjoining parts is .4mm on most FDM printers, but more distance between the parts makes it less
likely to fail.
Design to Prevent Overheating & Warping
Prints with narrow parts can often get overheated and warp the design. To prevent overheating in one place, you need to disperse the heat and allow the hot end of the extruder to move away from your object to give it time to “cool off”. You can do this by creating a thin object away from your 3D print that is the same height so that as you’re printing your design, the hot tip moves away to print the other object away from your design. This will create an extra tower whose only purpose is to divert the hot end of the extruder while
printing to prevent overheating.
Depending on the intended use of your printed piece, your choice of material can affect certain aspects of your design, and needs to be
taken into account for the best results.
For example, for parts that are meant for mechanical purposes, you need to consider the material strength and flexibility to ensure your design meets your requirements. Additionally, if your parts are meant to fit together with other items or other printed parts, you’ll need to take
into account how much your material will shrink and warp after cooling.
For a quick easy comparison of the properties of the most common types
of filament used in FDM 3D printers, check out our handy
3D printing filament guide,
a summary of which can be seen in the table below.
Ok, now that you understand the basics of designing for 3D printing and have gone ahead and done the design work, read Chapter 4 to learn how
to create a bullet proof print-ready file for 3D printing.
Chapter 4:
Prepare Your File for 3D Printing
Once you are finished creating your masterpiece, you need to make sure it will successfully 3D print. We’ll cover what you need to know
to go from picture perfect design, to ready-to-print masterpiece.
3D Design Export File Types
Once you’ve completed your design, you’ll need to export it in a format that 3D printers and various types of repair and slicing software can work with. While you may work with source design files in various format, including .STEP or .IGES, when it comes time to print, you’ll
want to use one of the follow formats.
.STL Files
STereoLithography (.STL) files are the most common file type used in 3D printable designs. This file format is widely supported by a variety of software packages, including design and slicing programs specific for 3D printing. This file type is quite basic in that it is made up of a series of triangles that represent the surface of the original 3D design, without common CAD attributes such as color, or texture. In most cases, you’ll want to export or convert your design to .STL format before printing. One downside to this format is that it’s not as easy to modify, so you’re best bet is to finishing modelling your design
before converting to .STL.
.OBJ Files
Object files (.OBJ) are another common format for 3D models. Unlike .STL, however, .OBJs can be used in conjunction with texture maps to relate dimension information (size and shape) as well as aesthetic information (color and texture). OBJ files are also typically easier to modify in design software than .STL, but aren’t supported as well
files for 3D printing file repair tools and slicing engines.
File Conversion
Most of the 3D design programs that we mentioned will give you the capability to choose which file type you’d like to export, but if you do need to convert the file to .STL, you can use Meshmixer, or an
online converter like
3D Transform
or
meshconvert.
These programs let you upload your design and will email you the .stl.
Pro Tip:
“If possible, use a
binary
.stl format instead of a
ASCIIA.
This is because the binary formatting compresses the file size to a printer friendly size without compromising any of the detail”
—
James Novak, a.k.a. edditive
Choose Your STL Export Settings
File size is important because it will change the way your design looks when you print it. If you’re designing something that is large, it’s best to keep your file as small as possible. This is especially true when you’re printing your design through a third party printing company like Shapeways because they have a 64MB limit. A standard file size goes from 200KB to 10MB, however, every printer have different limits so it depends on what printer you are using. The important takeaway here is that you want to have a file that’s as small as possible without losing
any of the design intricacies.
File Checking & Repair Software
To make sure your design file prints without mistakes, you should run your model through file checking software. Most 3D printer software will let you know when your file has an error by highlighting the area in red or removing it from the display altogether (see below for picture examples). If your print continues to fail and you can’t figure out why, there are file checking programs that can help check errors in your file and repair them. To be on the safe side, it’s a good idea to spend a
few minutes with these tools before you head to the printer.
There are a number of ways 3D designs can fail from a technical standpoint, but the most frequent reason for failed prints for mesh models is that the model isn’t water tight. This means there are small spaces in your mesh model that, if you theoretically filled it with water, would leak through those cracks. For a successful print, all 3D printing files have to be watertight and not all CAD software has
the ability to do this.
Here is a list of free programs that were specifically created for
modifying and repairing .stl files:
Works with:
Windows, Linux, OS X, iPad and Android Tablets, iPhone and Android Phones
Description:
Meshlab has a wide assortment of tools that can edit and repair 3D printing files. It is a simple and easy to use software that will accurately assess the quality of the file. The render menu also tells the user where the boundary and non-watertight edges are (see below for pictures). The software will tell you how many issues there are in your mesh which you can then repair with a number of features in the Filters bar. Although it is less user friendly than Meshmixer, it has
a broader range of capabilities to create a better quality mesh.
Works with:
Windows, Linux, OS X, iPad and Android Tablets, iPhone and Android Phones
Description:
Meshmixer has the ability to both modify .stl files and check them for mistakes. Modification features allow you to edit a file to change the surface of a design to, for example, add text to the design. We go over
this topic in more detail in our blog on
10 Step Guide to Modifying STL files.
Meshmixer also analyses .stl files for glitches in your model, like holes in the surface. It can also create supports for any overhangs in your model. You can also use Meshmixer to shrink the file by changing the resolution of the mesh, which can come in handy when dealing with
file size limits of printing bureaus and online marketplaces.
Description:
Netfabb Basic is a free program that analyzes and fixes errors in 3D files. You can also use this program to divide a large model into smaller parts if your design is too big for your desktop printer. There is a premium version of this software called Netfabb which is paid but offers more advanced features. It is also the same company that does
the automated file checking and file fixing for designs on Shapeways.
Works with:
Any web browser, iPad or Android Tablet
Description:
This software doesn’t require any downloading and will check for errors in your print and repair them directly in your browser. It will also check for whether there will be any grooves in your surface and whether or not your model will need support. You can save your file as an .stl
with your modifications.
Printing Bureaus / 3D Printing Services
Works with:
Internet browser
Description:
Going to a third party company who will 3D print your design for you is a great option for those who are not ready to buy a 3D printer. Websites
like
iMaterialise ,
Shapeways,
and
Sculpteo
will not only print your design and ship it to you, but they will make sure the design is error-free and attempt to repair the file if there are any issues. This takes away the need for you to run your design
through a file checking program and let the professionals take care of it!
Print-ready file good to go? Great! Let’s figure out how much someone might pay you for its use and the benefits of sharing designs for free
in Chapter 5.
Chapter 5:
Price Your 3D Models
The next question you may ask yourself is what price should I sell my design for? Should I share it for free? There are a few things you
should think about before you make a decision.
One option is to contribute your designs to the 3D printing community for free. This is typically a very successful strategy for getting your name out there and building a following, especially if you’re new to the world of 3D printing. Free designs can help drive traffic to your portfolio and encourage makers to print off your work and provide feedback on your products. This strategy tends to help build the community’s confidence and credibility in your work. Many of the top designers in 3D printing communities tend to have a mix of free and
paid work.
However, if you’re experienced in 3d printing or have proven your models can print successfully, chances are you put a lot of time and effort into your model. If you don’t feel right about giving it away for free, you may want to consider the option of charging a small but reasonable amount for it. Charging a small amount for your design
may even contribute to the demand for higher quality 3D printing designs.
When deciding how to price your item, where do you start? First you
need to find out:
What is the market value
Who is going to buy your model?
What concerns do purchasers have and how do you overcome them?
What is the Market Value?
For other products on the retail market, market value is usually determined by assessing the cost of input. This including things like research and development (R&D) costs, overhead, manufacturing, and delivery costs. However, for 3D design we will use factors like time to design and time to create as inputs. We will use time to design and time to create as our “X” factor to decide if your 3D design is complex
enough for someone to pay for. The basic formula goes like this:
Time to design + time to build = complexity value
It all comes down to comparing the complexity and price of what you’re making with other similar designs. If you were deciding how to price a design like the 3D printed tie in the picture above, you would want to compare it with other bow tie designs or necklaces with similar intricacy levels. If you put them in order from highest to lowest, you will take the middle number (the median value) and multiply that by the “X factor”. Then you check with your instincts - does this seem like a reasonable price or is it too high? For the tie above, the complexity value is more than a regular person would be willing to pay for it. In that case, you can choose to not offer a downloadable version or share
it free.
Who Will Buy Your Model?
One philosophy on maximizing the number of downloads on a design is to give it away for free. This isn’t always the right way to get you the most downloads. It’s important to keep in mind the price sensitivity of your target market. Is it someone on a budget like a student or is it a 3D printing enthusiast who has more money to spend? Think about other things that your target market spends or does not spend money on. If your design is targeted at students who don’t have a lot of money, it makes sense to offer a free download. In return for the free design, ask them to spread the word about your shop to get some brand value from it. If your design is meant for someone who has more money, think about
our formula above and what is a reasonable price to charge for it.
Pro Tip:
“Forego the mentality that in order to maximize the number of downloads a 3D print design file will get, you must give it away for free. Think instead of who will be most interested in your 3D print design model.”
—
Tracy Hazzard from
3D Start Point
Overcoming Purchaser Concerns
Have you ever walked into Walmart and seen the yellow sign at the very front offering a ridiculously cheap price for something that’s
regularly more expensive?
This is called Loss Leader Pricing.
Chances are they aren’t making a huge profit on that item and may even be losing money. The idea is, they lure you in with a great deal (whether you want it or not) in the hopes that you will buy their
other items which they are making a larger profit from.
You can use the same strategy for your online store. Offer a few models free of charge so people can see the great quality of your work and then the rest of your models you can charge a fee for. This will also
reassure the buyer that your models are good quality and print well.
Absolute Values
Designs costing less than $1 are 1.8 times likelier to be bought
than something that costs $2.50-$4.50
Next up, read Chapter 6 for places to start selling or sharing your
3D models.
Chapter 6:
Choose Where to Sell Your 3D Models
Once you’ve created your design and set a price, how do you make sure it gets seen by as many people as possible? Here are some of the different
distribution methods you can use to get your models in the market.
Digital Distribution
This option allows you to sell or share your designs online. One great advantage of this method is that it doesn’t create a lot of overhead costs since you don’t have to store anything. This is best option for hobbyists who want to share their designs without managing any physical inventory. It is also the most open option as it allows for communication between makers and designers. If the makers have any trouble or complications with printing, they can share their feedback
online. If you share your design on Pinshape, you have two options:
Download
Making your file available for download is the most common form of sharing online. To do this, you upload your files onto your online store and choose whether you want to make them available for free or charge for them. If you decide to put a pricetag on your designs, the marketplace will usually take a small percentage of the profits from each sale. The big difference between this option and streaming is that once someone
downloads your design file they can now edit the original file.
Streaming
With streaming, your design file is kept in the cloud. It is sent from the cloud to the printer so the person who streams is can’t edit or access the original file. This option allows makers to choose their slicer settings in a browser instead of their 3D printer software. The file is then sliced in the cloud and the instructions are sent to the printer. The maker doesn’t have to download any slicer software or additional applications so the printing process is smoother. This option isn’t possible for makers who can only send files to their printer through USB, so it can limit your market. The benefit for the designers is that your design is kept safe from any IP infringement since no one
can access the original files.
Physical Distribution
If you’d rather sell your final product instead of the design, you can 3D print your designs or have someone else do it for you. One advantage to this method is that anyone can buy your work, even if they don’t have
a 3D printer!
Print Service
If you don’t have a 3D printer, you can print your designs through a third party printing business or upload your design to a site that will 3D print them for you. Companies such as Shapeways or 3D Hubs allow you to upload your design to their website and people can order your item through them. That way, you don’t have to worry about the printing or shipping. These companies also have a larger variety of material to
choose from so it gives them more options for filament colour and texture.
All3DP has a
comparison engine
where you can compare the price of these different services.
Online Marketplaces
If you decide to hold inventory of your models and sell them yourself, you can put them on an online marketplace like Etsy or Ebay. Online product marketplaces are a crowded space but you’ll see many unique products for sale, including 3D printed items! One company called
Copypastry, makes
customized 3D printed cookie cutters
that look like your face on Etsy.
These types of marketplaces will usually charge a listing fee and will also charge a percentage of your sale value when you sell an item. In general, we recommend staying away from giant marketplaces like Ebay because your designs are less likely to get noticed since competition
is so high.
Selling In Person
If you prefer to see your customers in person and let them touch and feel the product, there are plenty of craft fairs and artist conventions where you can set up a booth and show people your prints person. Think back to who your customer is and try to go to events where you’ll find people interested in your work. For example, if you’re printing
jewelry, a street market or craft fair is a good place to start.
Personal Websites
If you want to sell your work separately from other online marketplaces or stores, one option is to create your own website to show and sell
your work. One Pinshaper who does this very well is
3DKitbash.
To get started, you can build a website from an online template or you can hire someone to create one for you. If you plan to sell your designs on the website you’ll need to integrate a payment system with your
site, like Paypal.
Chart Summary
The good news is, there are a ton of ways for you to sell and distribute your designs. Here’s a summary chart that goes over the benefits and
drawbacks of each option.
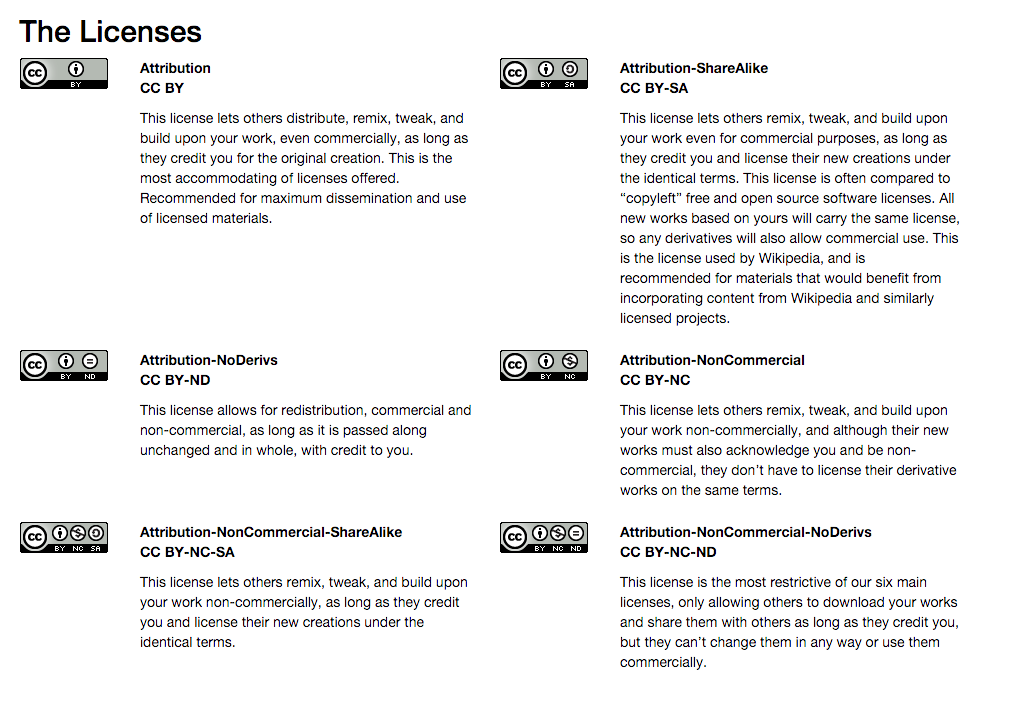
One thing to be aware of when you list your designs on third party websites and marketplaces is the permissions you give to those who can download your work for free. Some licenses grant other people access to edit your work to different degrees, and others restrict the editing within certain parameters or don’t allow editing at all. It’s important to be aware of what license you agree to when you sign up to a marketplace. The most well known licenses for selling 3D art
is the
Creative Commons
which are in the table below:
So what’s the best method to sell/share my 3D designs?
There are benefits and drawbacks to every method of design distribution,
so we asked a few of our designers on Pinshape what they thought.
Tanya Wiesner prefers 3D printing communities as the preferred method for her to sell designs. She joins multiple 3D communities to develop her reputation and attract contract work. When it comes to selling her
designs on Pinshape, Tanya prefers streaming:
Pro Tip:
“Streaming allows me to to upload and protect my designs that I don’t want to distribute by download, and sell designs at a lower cost compared to direct downloads.”
—
Tanya Wiesner
Dan Steele who is another designer on Pinshape loves the open source
aspect of 3D printing communities and shares all his models for free.
Pro Tip:
“I generally use a CC Attribution non-commercial license. I like this license because it allows other hobbyists to download, use and change my model. It also doesn’t allow someone to make a bunch of money off it. This feels like the most fair model to me”, says Dan. “I also go to local maker meet-ups and maker fairs to share physical copies of my objects. I sometimes sell pieces at local coffee shops and toy stores.”
—
Dan Steele
Chapter 7:
Use Marketing Tips to Sell Your 3D Designs!
Once you have listed your design on a marketplace or website, how do you get visitors to your page & clicking the “download” button? In Chapter 1 we talked about how to create a hot selling design, now we’re going go over how to market your design so that it’s sure to
be a hit with lots of downloads and interactions.
1) Make it affordable
This one is pretty obvious but the lower the price of the design, the more likely it is to sell. Designers that tend to see the most success are the ones that price their work in a range that most consumers can easily afford, without question. In fact, designs costing less than $1
are 1.8 times likelier to be bought than something that costs $2.50-$4.50.
2) Take pictures or videos of your print
Yes, this means you have to actually print your design! In addition to being able to take impressive photos of your design, this also enables you to give the optimal printer settings to the community. If you don’t have a 3D printer, you can try asking a member of the 3D printing community to test print it for you. There are wonderful folks who would be willing to give your design a try! We suggest visiting an online forum, such as Pinshape’s forum, to get in touch with makers
and ask for a hand.
Great photos are one of the most influential factors in making your design more sellable. Pinshape conducted a study on the main factors in successfully selling 3D designs and found that designers were 3.1 times more likely to sell their design if they had 3 unique photos of
their design from different angles.
Why? Makers want to see what your designs looks like once it’s printed, rather than just looking at the CAD file image. We found that those designers who printed their design and posted high quality photos were
7.3 times more likely to have their design sold!
Taking a picture of your printed design is important because it tells the Maker that your design is actually 3D printable and it turns out well. Rather than paying for a design just to find out that it doesn’t print properly, makers will have more faith in the design if they know
someone else has successfully printed it before.
One Pinshaper
Mao
does an exceptional job of taking pictures of his prints (above). He makes especially good use of the backgrounds in his pictures that
really bring his design to life.
Pro Tip:
“In my previous “life,” I was working in advertising. That’s why I have photography skills, and I use a Nikon with a 14MM wide angle and a 50MM.”
—
Mao
We understand not everyone is a photographer, so here’s some photo taking tips to get you started. And remember, practice makes perfect!
It will take some time to get great looking photos.
For some designs, the best possible way to show them off is by creating a short video. Whether you’re looking to share simple assembly or post-processing instructions, or if you want to show your product in fully-functional action with hollywood quality special effects, a video
is a great way to clearly communicate how awesome your design is.
As an example, take a look at
3DKitbash’s Raven Skull
Assembly Tutorial, which walks Makers through the process of building
their awesome print.
In Matthew Wiese’s video for his
sunglasses,
he runs people through how he made his design, followed by post
processing steps required to finish the model (screws, sandpapering, etc.).
There’s no need to make a video teaching everyone how to make every design, but it’s easy to see how the video makes the product more
engaging, connecting the maker and the designer in a more intimate way.
Pro Tip:
“When creating things for YouTube I try to think of things everyone can enjoy and are shareable. It’s a very slow and lonely journey in the beginning but being consistent in your video posting helps tremendously
in getting your channel into Google’s search analytics.”
—
J Wall
4) Write a Good Description
Descriptions are your opportunity to tell a story about your design which gives it a personal touch. It can be the difference between someone skimming past your design or someone actually engaging and relating with your designs. According to our research, descriptions that are 50 words or longer are 1.7 times more likely to sell than those
with short or no descriptions.
Similar to pictures, descriptions allow makers to understand a boost
their confidence in your designs which creates more transactions for you.
Zheng3
is one of our designers who does an amazing job of descriptions on his designs. He tells us why he starting creating stories with is designs:
To read the story of some of Jim’s designs, visit
his page on Pinshape.
Pro Tip:
“In the spirit of throwing-everything-at-the-wall-and-seeing-what-sticks, lately I’ve been attaching short stories to my models, because since time, immemorial humans have loved stories. These stories make the models more interesting by adding a little sumpin-sumpin that doesn’t need to be downloaded.”
—
Zheng3
Here’s some ideas of things you can include in your design descriptions:
What is the purpose of your design? Does it have a functional use?
Tell us the story of why you decided to create it. Was it to solve a
problem you encountered in your everyday life?
Tell us some technical details of how to best print it. Should parts
be printed separately? Is there a specific temperature that works best?
What extra tools did you use for post-processing (if any)?
The description area allows you to connect with your visitors and inform them of why they should download your design. Try to give as much
detailed information as possible and your customers will appreciate it!
5) Adding Tags on Pinshape
To make your design easier to find and more searchable, Pinshape allows you to add tags to your design. Similar to tags on social media, you’ll want to use keywords that are relevant to your design. These are words that we use to categorize similar designs together so people can find what they are looking for more easily. When someone comes to the site and wants to find a design like yours, what keywords would they use?
Try to keep your tags short and clear.
This is what the tags section looks like on Pinshape:
6) Be Active in the Community
3D printing is still in it’s early stages and can be difficult for
beginners. That’s why there are a number of
3D printing forums
and communities that are there to help support each other. If you are involved in the community, not only will you be helping others but you are building your brand. You are more likely to get people to come to your page and download a design when you are actively involved in the
3D printing community.
You are also more likely to get people spending time on your page if you have more than one design. Our research shows that 50% of downloads happen on designs in the first 2 months after uploading. The more
designs you have, the better chances you have of one being downloaded!
Pro Tip:
“If in doubt, ask others that have the experience you may lack. It can save you hours of headache and maybe even get you a few extra tips and tricks.”
—
Daniel Noree
While you’re waiting for the pats on the backs or cash to roll in,
read Chapter 8 to explore some new toys for your design toolbox.
Chapter 8:
Choose Your 3D Design Hardware
We’ve covered the steps on how to create a great 3D model and start selling it to make some income! To take your designs to the next level, you may want to invest in some hardware. If you want to bring your designs to life, there are a number of affordable 3D printers on the market offered by numerous 3D printing companies. You can also create a model based on a real object with a 3D scanner. We’ll go
through some of your options.
3D Printers
You don’t need a printer to be a 3D designer, but you can design a lot better for 3D printing if you have one to test out the design yourself!
Plus, it’s a lot of fun.
There are a ton of desktop 3D printers on the market, all ranging in price and capabilities. However, keep in mind that quality is not necessarily directly related to the 3d printer price. Whether you are a beginner maker and looking for a cheap 3d printer or you are looking for a printer with all the bells and whistles, here are a few options
to get you started:
Beginner Printer
Craftbot by CraftUnique ($999 USD)
This is an affordable and easy-to-use printer for those who are just starting their journey as a Maker. It does have a proprietary slicer software but prints with the main filaments including ABS, PLA, and HIPS. The build volume is quite large 250 X 200 X 200 so there is lots
of room to play around with larger designs!
Intermediate Printer
Simple Metal by Printrbot ($649 USD)
It’s affordable and it has
great reviews from the online community.
This is an open source printer which means you can upgrade it later with software and hardware add-ons. Assembly and setup may take some time but
once you do it’s an overall sturdy printer that makes good quality prints.
Enthusiast Printer
Form 2 by Formlabs ($3,499)
This printer is the most expensive of the bunch (by a lot!) but it’s worth it if you’re a more experienced maker that will take advantage of the added features and top notch quality. One great feature is the machine can connect to wifi so you can send your files to the printer without a USB. This machine also uses resin as input instead of filament so you also have to buy the bottles of resin to print with, which also
aren’t cheap.
3D Scanners
If you want to create a replica of something in real life, 3D scanning may be the way to go. 3D scanning can use images (photogrammetry) or a laser to turn objects and environments into digitalized 3D models. That means you can take any object and create a perfect replica in 3D without
having to learn any CAD software to recreate it by hand!
So how do you get a 3D scanner without spending a ton of money? There are some reasonably priced options for 3D scanners and scanner add on’s
for your phone. Here are some of your options:
Your Smartphone (No additional hardware)
If you’d like to find out more about 3D scanning, there are a plethora of apps on iTunes and Google Play that you can try. None of them are advanced enough to recommend yet, with one exception: 123D Catch. This app was created by Autodesk, one of the well known players in the 3D CAD industry. The technology is still in the early stages so it won’t create any reliable results but advances happen quickly and it is
definitely something to watch out for in the future!
Works with:
Windows + any camera, or iOS Android and Windows phones
Description:
This phone app is accessible to almost anyone with a phone camera. For it to work, you must take a picture of an object from all angles which is then pieced together in the cloud to create a complete 3D model. There are some instructional videos that walk through the proper technique to take pictures and successfully turn it into a 3D model. The program also allows you to transferring your scan from 123D to
another program to edit the design.
This is one of the most versatile scanners on the market since it can attach right onto your iPad! With this little device, you can scan rooms and heads to create a 3D model in real time. The Structure Sensor took off from a kickstarter campaign when they raised $1.2 million from over
3,500 investors! Will and Norm posted a
video review
where they test the Structure Sensor and give their thoughts.
You can scan objects anywhere with this handheld portable 3D scanner. The grips make it easy to hold onto and accurately capture all angles of an object with the scanner. The Sense is compatible with both Windows
and Mac OS. The positives and drawbacks are broken down in Ben Heck's
online review.
Xbox Kinect
If you’ve got one of these at home for your Xbox, you may want to try it out as a 3D scanner! The Kinect for both Xbox 360 and Xbox One can
work as 3D scanners. The setup does require some tinkering but there are
tutorials
that walk through how to get started and the tools you will need. If all goes well, you should have an .stl file you can print or edit
with your CAD software.
Similar to the Structure Sensor scanner attachment, the iSense connects to your iPad or iPhone 6 to scan objects. It does have better range and accuracy than the Structure Sensor so it’ more expensive. Check
out this video that shows the iSense in action.
If you are planning on buying both a 3D scanner and printer, you might be interested in this two-in-one 3D scanner and printer. It has a 2MP camera for high quality scans (the iPad scanners are around 1.2MP resolution). It does have a proprietary system so external software
and filament may not be compatible.
Check out what CNET thought of the Da Vinci 1.0 AiO
This desktop 3D scanner was the first one funded through a crowdfunding campaign. Their fundraising efforts got them $500,000 to develop the product we see today. It has a 360 degree rotating platform to capture all the angles of an object and has a moving
camera head with a laser scanner for precision scanning.
The Einscan-S has two different scan settings: automatic and free scan. The automatic mode will scan your object on the rotating surface in three minutes with an accuracy of .1mm . Free scan moves the scanner on a tripod around the object. With either of these settings, the end product is an STL file that can go directly to your 3D printer. Instead of using lasers to scan objects, they use a light technology which is supposed to give higher accuracy. We’ll let you be the judge - check out
these designs on Pinshape that were scanned with the Einscan-S:
This is an open source scanner which means anyone in the community can
help continue it’s development.
BQ
are also fellow designers and Pinshapers!
Last Words
We’ve covered a lot of ground in this e-book and like most good things, learning 3D design will take a lot of time and patience. This handbook was designed as a tool for beginner 3D designers to refer back to again and again so we do hope that it will serve as a great resource on your 3D design journey. If you have any questions or comments, please feel
free to reach out to us at
connect (at) pinshape.com.
Happy Designing!
Contributing Authors
Tracy from
Hazz Design:
Tracy contributed her expertise on pricing 3D models. Hazz Design is a product design firm that has topped $500 million in retail sales for
their clients, so read on for more tips on how you too can sell!
James Novak, a.k.a.
edditive:
James is a PhD and specializes in 3D printing research and writes a
3D printing blog called
edditive.com.
For this article he gave us an up-to-date guide on the free design tools
specifically useful to entry-level designers and 3D print enthusiasts.
Lydia Cline:
Lydia Cline's
is a 3D designer and author of books on 3D design. She contributed
her expertise on beginners software and different types of 3D modeling.
Pinshape:
Pinshape is the next generation 3D printing community & marketplace for brands, designers and makers. Pinshape specializes in making it easy to find and successfully print great 3D designs, while mitigating
intellectual property risks through secure streaming technology.


