


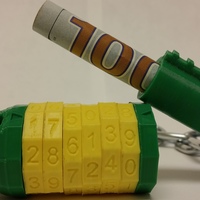
Need a lock? Instead of buying one, why not print your own ?
DISCLAIMER: I am NOT responsible for stolen items or belongings that were locked with these locks. These locks are meant to test the limits of 3-D printers and pilot new frontiers for 3-D printing technology.
There is a YouTube video that guides you through the process of making these locks. I worked really hard on it! Go check it out at:
If you wish to make these locks, there are a few things you will need:
Plastic Cement
Chain Links (Optional--Measurements shown in YouTube tutorial)
Nylon Twine or Thin Steel Cable (For 2-digit lock ONLY)
Heat source such as a lighter
Exacto-Knife or flat-head screwdriver
PRINTER SETTINGS:
Printer: CoLiDo DIY -- PrintRite
Slicer: Cura 2.3.1
Material: PLA
Extruder Temperature: 190*C
Bed Temperature: N/A
Speed: 50-60mm/s EXCEPTION: When adding chains to the lock (See instructions).
Infill: 30% or higher for a durable part. I used 10% for my demo locks.
Brim: 8mm for ALL PARTS.
Layer Height: 0.2mm
Rafts: NO
Support: NO
INSTRUCTIONS:
Step 1: First decide what type of lock you need and what its purpose will be. Once you decide what size of lock you need, print the Chamber and Cylinder files with the proper number of digits. Example: I need a 4-digit lock; I need to print: Chamber (4 Numbers) and Cylinder (4 Numbers). NOTE: Hollow Cylinders are hollow on the inside to allow storage of items inside the lock. Hollow Cylinders correspond with Hollow Chambers, and Solid Cylinders correspond with Solid Chambers. This rule only applies to the 6-digit lock.
Step 2a (4 & 6 DIGIT LOCKS ONLY): If you wish to create a lock with chain links, print the Chamber and Cylinder halves separately. When each half is about 8% completed, slow the printer to 10-20% of its original speed (the slower, the better). Wait until the print-head moves to one side of the print and slot the chain into the half-printed loop in the base of the Cylinder/Chamber. This is demonstrated in the YouTube tutorial. MAKE SURE THE PRINT-HEAD WILL NOT COLLIDE WITH THE CHAIN! If the print-head collides with the chain, remove the chain and wait until the print-head has reached a sufficient height and place the chain in the loop again. If the printer does not collide with the chain, set the printer to it's original speed (100%) and wait for the print to finish. Repeat this process for the other half of the lock to permanently chain the two halves together.
Step 2b: Decide on a combination for your lock. In the download there are two files for digit rings: Low Tolerance Rings (LT) and Normal Rings. Both appear to be the same and contain digit rings 0-9. However, they could not be more different. Normal rings offer a little freedom when entering combinations. The digits do not have to line up 100% perfect to lock/ unlock the lock. However, the Low-Tolerance Rings MUST line up perfectly. I have tried the LT rings on the 4-digit and 6-digit locks; they cause a lot of frustration and anger. The only place I could see the LT rings being practical is on the 2-digit lock. Otherwise, use the Normal Rings.
During the printing of the digit rings, there is a chance there will be some stringing. THIS IS NORMAL. Just use flush-cuts in post processing to clean up these errors.
Step 3: Print the End Ring. This is the most important ring in the whole lock.
Step 4: There is a chance the Chamber half of the lock will need some heat treatment to clean up some of the overhangs. Near the top of the model (opposite end of the chain/ mounting hole), there are a few slots that house the End Ring. Make sure to clean up these overhangs to ensure proper functionality of the lock. This is demonstrated in the YouTube tutorial.
Step 5: Slide the digit rings onto the cylinder. Example: I want my combination to be 567314, so I need to print rings 5, 6, 7, 3, 1 , and 4. I then slide the rings on the cylinder in the order 567314 from left to right.
Step 6: Apply a thin band of plastic cement along the inner wall of the End Ring. Slot the End Ring into its housing at the end of the Chamber half. Slightly rotate the End Ring until it locks into place. NOTE: The notch in the End Ring MUST line up with the notch on the Cylinder! If this is done incorrectly, the lock will never lock/unlock! So, make sure to get it right the first time. This is demonstrated in the YouTube tutorial.
Step 7: Ensure all digits still spin properly, and clean up any excess plastic cement. Allow the cement to cure for 2-4 hours.
Step 8 (2-Digit Locks ONLY): Thread some thin steel cable or nylon twine through the bottom loop of the Cylinder and Chamber halves to connect them together.
That is the completed lock! When entering combinations into the lock, I recommend using your thumb to hold down digits that you have already entered into the lock. This prevents rings from binding with each other and ensures a successful unlocking/ locking of the product. In order to lock and unlock this lock, the correct combination must line up with the arrows on the Cylinder and Chamber halves of the lock.
For more information, check out the YouTube tutorial. Thanks for viewing my design!
Have a nice day!
-Frankie
Loading prints...
Linear Combination Locks
Creative Commons Attribution-NonCommercial-ShareAlike
You can distribute, remix, adapt, and build upon the material in any medium or format for noncommercial purposes only, with attribution and under the same license.
 Licensed under CC BY-NC-SA


Loading comments...