
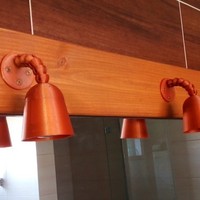


SummaryThis is derived from articulated PCB arm by giufini:
http://www.thingiverse.com/thing:801279
I've used 5 joints between the wood base and each lamp shade due to a GU10 socket cable length limitation - 13cm / 5". It is sufficient to position the lamp shade to desired direction.
DO NOT use other than LED bulbs when printing with PLA. Otherwise the shades will get melted shortly and can cause the short circuit in the socket or cable.
Printed with copper color PLA (not copper fill).
You can glue GU10 socket inside the shade if needed, Eventually use 2 small screws in socket thru holes to tight it up inside.
Be careful with electrical wires and ensure the safety (insulate as appropriate if cable extension is needed, avoid short circuit to prevent the fire etc.)Print SettingsPrinter Brand: RepRapPrinter: Prusa I3Rafts: NoSupports: NoResolution: 0.25mmInfill: 40%Post-PrintingRemove the bridges covering GU10 socket inside the shade.
The socket has a key. Position it properly before pressing too hard into the shade.
Once socket is in place, start adding joints and finish with lamp base. Tight the completed arm by 3 chipboard screws to a base board.
Do the wiring and add the bulbs.
Turn on the light & enjoy!
Loading prints...
Articulated GU10 Lamp
10
likes
10
collections
Tags:
Creative Commons Attribution
You can distribute, remix, adapt, and build upon the material in any medium or format, as long as attribution is given to the creator.
 Licensed under CC BY



Loading comments...