


Summary
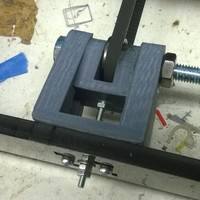
I purchased my Prusa I3 printer off of Amazon from Hictop in Feb. 2015. Originally, to adjust the y-axis belt tension required flipping the whole printer on its side and playing with the cable attach points to tighten the belt. That got old very quickly. I saw another similar tensioner, thing # 807702, and I adapted the general design to fit my printer. This design works well and I will be happy if it will help someone else with belt tension issues.
The Axel bolt is 8mm in diameter and the bearing an 8x22x7 bearing. The attach hardware is 3mm machine screws as is the tensioning screw. You will need to drill a new hole for the tensioning screw. Otherwise this assembly is a direct replacement for the original. Y-axis travel is the same but caution should be taken when tightening the belt as too much tension can easily be placed on the belt. The y-axis will not operate properly if there is too much tension and will cause the stepper motor to skip.
To adjust tension, loosen the nut on the 8mm bolt and jam nut (if used) on the tensioning screw. Tighten the tensioning screw checking belt tension by hand. Tighten the 8mm bolt nut and screw jam nut (if used) and test printer operation. I recommend running a calibration test after belt tension.
Loading prints...
Hictop Prusa I3 Y-Axis Belt Tensioner
1
like
1
collection
Tags:
Creative Commons Attribution-NonCommercial-ShareAlike
You can distribute, remix, adapt, and build upon the material in any medium or format for noncommercial purposes only, with attribution and under the same license.
 Licensed under CC BY-NC-SA
Files Included
2 downloadable files:
Free download - login required
Downloaded: 126 times
Downloaded: 126 times

Loading comments...