10 Easy Steps to Remixing 3D Designs With Meshmixer
In this tutorial Pinshape ambassador James Novak (aka edditive) from edditive.com, shows you how to mix together your favourite Pinshape files. With this blog, you will become a master of the mashup in just 10 easy steps.

10 Steps to Remix Designs in Meshmixer
The mashup is a favourite technique in the music world that combines two or more songs together into a single song. They might be from completely different eras or genres and when cleverly mashed together, they create a new smash hit. But did you know that creating a 3D printable mashup is just as easy as creating a musical one? Take a bit of File A, mix it with File B, and you now have your own creative design.
For this tutorial we are using Autodesk Meshmixer. Meshmixer is free to use and is excellent for manipulating and repairing STL files. If you’re interested in learning more on repairing files, I wrote another tutorial on how to repair your .stl files. You can follow the step-by-step example below, or watch the real-time video of the process to see just how quick it can be.
First: A Note About Licenses

Before you go crazy mashing up designs created by other people, it’s important to be aware of the Creative Commons Licensing for your files. Not all designs are permitted to be remixed or re-shared. Both files used in this tutorial have the Share Alike feature enabled, meaning that you are free to remix the files and re-share them on Pinshape. However, you must attribute the original designers for these files. You are are also not permitted to financially profit from your remix and you must share your file using the same license. This permits others to remix your remix, and so on.
If you’re unsure of whether you are allowed to use a file for a mashup, just click on the license to see the description of the license limitations. It’s important to respect the wishes of the original designer. That way, everyone is encouraged to share designs with confidence.
Step 1: Find Your Mashup Files
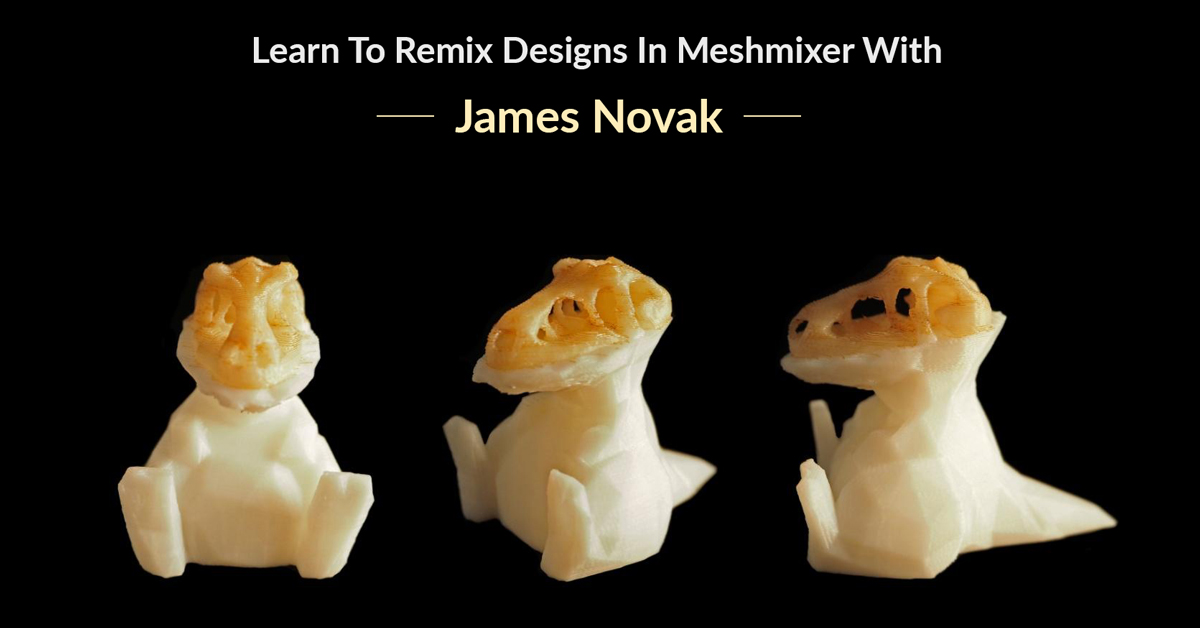
Just like a musical mashup, a 3D printable mashup may be an exciting re-interpretation of a classic. On the other hand, it may be a chaotic mess that sends everyone running from the dance floor! There aren’t really any rules and you can have a lot of fun mashing multiple designs together. However, getting it right requires a bit of patience. The first step is searching to find two or more files that will work well together, resulting in something that looks like it was designed that way from the beginning. For this example we are using two files freely available on Pinshape:
- Low Poly T-Rex by steven_dakh
- The T-Rex Skull by harry (we are only using the head piece, not the jaw)
Step 2: Meshmixer Import

Open Meshmixer and use the Import button to bring both files into your workspace as pictured. When importing the second file, a pop-up window will ask if you want this file to be opened in a new window or appended to the current window. Select Append so that both files are together. This will also open the Object Browser window (shown on the right) which is how you can select which model to work with. If you are familiar with programs like Photoshop, this window works the same as your layers option. It allows you to show/hide models as you are working on them.
As in this case, you will probably find that your two models are in different locations and at completely different scales. This is normal since you are working with files created by different people, possibly in different software. In the next step we will begin fitting them together.
Step 2: Fitting

Depending on your files, this can be one of the more time-consuming stages of the mashup. In this case the T-Rex skull is far too large for our purposes and definitely needs to be moved closer to its final location. Select the T-Rex Skull in the Object Browser window, click the Edit button on the left panel, then on Transform. Using the central colored controls, you can:
- Rotate the skull (click and drag on the arcs)
- Move its location (click and drag on the arrows)
- Scale in one specific dimension (click and drag on the dot at the end of the arrows)
- Scale uniformly (click and drag on the central white dot)
The goal for this example is to get the skull fitting just inside the “skin” of the Low Poly model, just like a real skull. It doesn’t need to be perfect just yet. We will make final tweaks later. Click Accept when you are happy.
Step 3: Cutting

With the skull roughly in place, we can now trim away the head of the Low Poly model. This sounds gruesome, but I promise no T-Rex’s were harmed in the making of this tutorial! Select the Low Poly model in the Object Browser, click on Edit in the left panel, then Plane Cut. We will use the same transform tools from the last step to rotate the plane on a slight angle, and move it to just below the line of the teeth in the Low Poly model. The wider blue/purple arrow will flip the direction being cut, and if your skull is roughly in place, you will get a nice X-Ray view of it as shown in the image. When you’re happy, click the Accept button to slice the top of the head away permanently.
 Step 4: Tweaking
Now that we can see the T-Rex Skull, it’s time to tweak the size and location so that it fits perfectly. Use the Transform tools from Step 2 to scale, rotate, and move your skull into the perfect position. For this example, I have scaled the skull down a little between the nose and back of the head (using the green dot) as well as the width (blue dot). A small amount of extra rotation was also needed (red arc) to line it up with the Low Poly model. It’s important to note that it’s OK for parts of the T-Rex Skull to be sticking out of the Low Poly model. We will trim this model and make some tweaks.
Step 5: Second Cut

With the skull perfectly located, we can repeat Step 3, except this time for the T-Rex Skull (selecting it in the Object Browser). We want to trim away the section of the skull below the Low Poly model, removing any of the sections protruding from this model. Your Plane Cut should be located similar to the image shown, just below the original cut. If you try to line it up perfectly with the previous cut, or slightly higher, the two models won’t be able to join together. This will cause problems when trying to 3D print it. Click Accept to complete the action. Note: the T-Rex Skull will never perfectly fit the cut-away of the Low Poly model. One is anatomically accurate, the other is a “cartoon-ish” toy. We will manually correct this in the following steps.
Step 6: Sculpting – Flatten

This is one of the most fun steps! It reminds me of being a kid playing with Play-Doh or clay. Meshmixer has a range of sculpting tools that will allow you to digitally push and pull your STL files, just like a piece of clay, and if you’ve ever used 3D CAD tools like Sculptris or Mudbox, you will be a pro at this step. In the left panel click on Sculpt, Brushes, and select the Flatten brush. This brush will push your model in and flatten it. For this example, the back of the head does not neatly fit within the Low Poly model (unless you scaled it right down which may make the skull look too narrow), so we are going to use this Flatten brush to push the skull until it looks right.
Make sure you have the T-Rex Skull selected in the Object Browser, and use the left-click to start pushing the model in. Start with short clicks to see how it works, and then try holding the left button down to continuously push the model. As you become confident, the settings in the left menu will allow you to control the size of the brush and the strength of each click of the mouse. Explaining this tool in words is challenging, so the video tutorial will help show you how this tool works. All we are trying to achieve is the back of the skull fitting within the “skin” of the Low Poly model.
Step 7: Sculpting – Draw

The opposite of the Flatten brush is the Draw brush, which will pinch and pull material outwards. For the T-Rex Skull, there are two main areas we will use the draw brush: the back of the skull (to remove the flat details and make it look more natural) and the “cheeks” as shown in the image. See the video I made for more detailed instructions. Again, because these two models are different in style, sculpting will help improve the illusion that the final 3D print was designed like this from the beginning. Using the Draw brush, pull out the cheeks of the T-Rex Skull to follow the line of the cut section of the Low Poly model. You should end up with a nice perimeter around the skull. Imagine this as a layer of skin and muscle around the skull. Of course, you will need to do this on both sides. As you gain confidence with these sculpting tools, you will realize how powerful they can be for editing any STL files you like.
Step 8: Joining
When you are happy with the final look of your remix, the last step is to join your files together into a single model. However before you do this, I highly recommend you save your Meshmixer file at this point. If you save after the parts are joined, and come back to this file at a later date to edit it, you won’t have the separate parts to work with anymore, just a single STL file which will be very time consuming to separate again, or build from scratch.
In the Object Browser, select both files by holding the Shift button on your keyboard. A new menu will appear on the left which are specific functions for joining multiple files together into a single object. We are going to use the Union tool which you may be familiar with if you’ve used other 3D CAD tools. This command will join both files together in the best possible way for 3D printing. This may take a few seconds to process, and there will be a few options that we can tweak, however the defaults work well for this example. When complete, you will notice now in your Object Browser window there is only one file.
Step 9: File Check
If you’re experienced with 3D printing already, you know the importance of a watertight STL file. For those less familiar, this is the requirement for your model to have no gaps in the surfaces where water could hypothetically leak out. This is also called being a manifold model. If your file is not manifold, it will not 3D print, or will print with some strange defects. When we chop and sculpt a STL file, there’s a chance that we unknowingly create little gaps and errors that can’t easily be seen by the naked eye. Luckily Meshmixer has an eye for detail!
Click on the Analysis button on the left panel, then Inspector. This will highlight any problems in your design, which you can manually go through and fix one by one. To fix any errors automatically, just click the Auto Repair All button which will clean things up. In this example I ended up with four problems that might have caused my 3D print to fail. I couldn’t see on screen, so this step is really important, especially if you plan to share this file on Pinshape for other people to download.
Step 10: Export and Print
You made it, well done! Finally you are ready to click on the Export button on the left panel to save this file as a STL ready for 3D printing. You now have all the basic tools required to create your own mashups!

If you’d like to download and 3D print the final model from this tutorial, just follow this link to the file on Pinshape, which is yours for free. Maybe you can even create a mashup of this mashup and share it back on Pinshape for someone else to mashup? You get the idea!
The mashup is a fun, easy way to start designing without needing to create a 3D model from scratch, and gives you the creative freedom to put your spin onto just about anything. Just remember to credit the original designers so that others can find the files you used, and everyone can enjoy remixing the world their way.
If you have any questions or things to add to this tutorial, please let us know in the comments below.
![]()


